Pace Count and Dead Reckoning: Building a Personal Navigation System When Visibility and Landmarks Fail
When GPS Dies and the World Turns Blank: Why Pace Count and Dead Reckoning Still Work
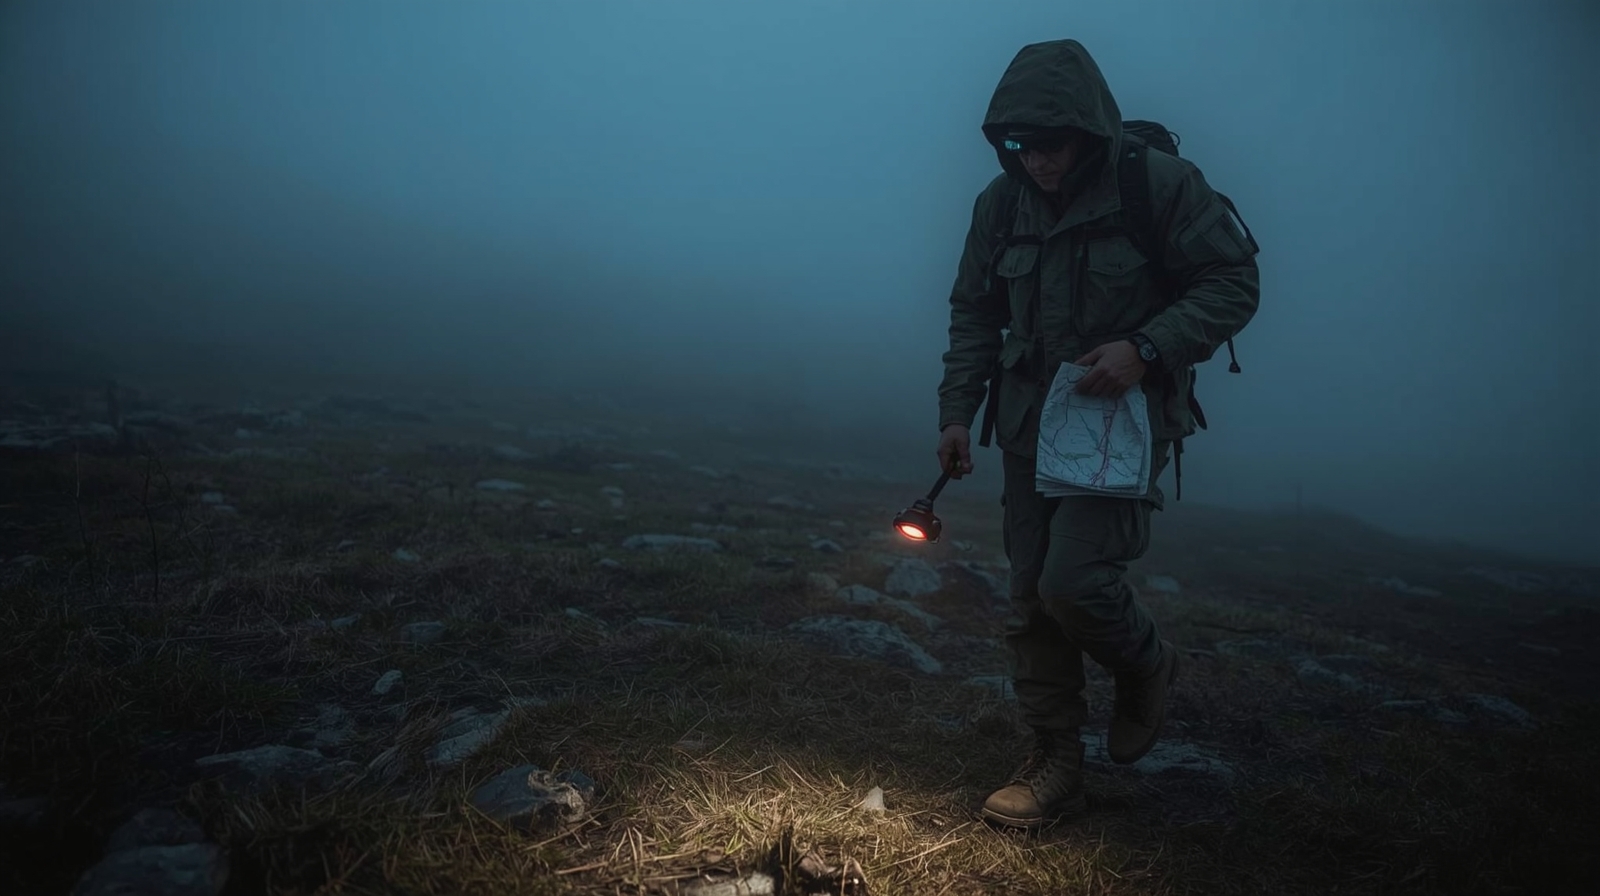
If you’ve only navigated with a phone line on a screen, low visibility can feel like someone turned the map off. Fog deletes ridgelines. Snow erases trails. Night reduces everything beyond your headlamp to a flat wall of black.
Related Articles:
Pace count and dead reckoning are the opposite of that fragility. They’re not perfect, but they are dependable because they don’t rely on batteries, cell coverage, or recognizable terrain features.
To use them well, you need to understand what each tool does-and what it does not do.
Pace count is a distance tool you can’t drop
A pace count is your personal conversion between steps and distance. Once you know how many paces you take to cover 100 meters (or 100 yards), you can estimate distance traveled even when you can’t see far.
In military land navigation, this is the backbone of movement when terrain association fails. You don’t “feel” your way to the objective. You move a measured distance on a controlled direction, then confirm your location using whatever evidence you can find.
The key is accepting what pace count is good at: repeatable distance estimation. It’s not a magic trick, and it won’t save sloppy planning. But paired with a compass bearing and disciplined movement, it becomes a system.
Dead reckoning is the method that turns numbers into location
Dead reckoning (DR) is traveling from a known point to another point using a planned direction (azimuth/bearing) and a measured distance. You start from something you’re certain about, then you “reckon” your way forward.
Done right, DR gives you a controlled search problem. Instead of wandering until something looks familiar, you move a specific distance and then expect specific features-like:
- A trail crossing
- A creek
- A saddle
- A road
The fewer “maybes” in your plan, the more confident your navigation becomes.
What makes these methods hold up under stress
When conditions deteriorate, your brain doesn’t get smarter. It gets narrower. That’s why systems matter.
Pace count and DR work because they reduce navigation to two measurable inputs: direction and distance. If you can keep those honest-and you plan your route with backstops and handrails-you can navigate in terrain that feels almost featureless.
That discipline pairs well with other “boring but lifesaving” field habits. If you’re managing cold risk, review hypothermia recognition and rewarming priorities because navigation errors often start with simple performance failure.
Map, Compass, and Your Body: Building the Navigation Framework
Before you start counting steps, build a framework that makes your pace count useful. Pace count without a direction is just walking. Direction without distance is just hoping.
This section sets the foundation so the rest of the techniques don’t collapse when visibility drops.
Know your map language before you need it
Dead reckoning assumes you can interpret the ground using a map. That means you understand contour lines, scale, and how terrain funnels movement.
If you want an authoritative refresher on topographic basics, the USGS has solid resources on topographic map symbols and features.
Keep it simple and prioritize what you can reliably recognize in bad conditions:
- Major linear features (streams, ridges, roads)
- Major elevation changes (ridges, draws, saddles)
- Obvious “catch” features you can’t miss
A practical habit: before moving, circle your start point and draw your intended route legs. Then identify at least one handrail (a feature running alongside your route) and one backstop (a feature that tells you you’ve gone too far).
Compass fundamentals that matter in low visibility
You don’t need a fancy compass, but you do need consistent technique. In poor visibility, small sloppiness becomes big error.
You should be comfortable with:
- Setting and holding an azimuth
- Following a bearing using a distant point (when possible)
- Boxing around obstacles and returning to line
- Adjusting for magnetic declination
For declination, NOAA provides a reliable magnetic declination calculator. Print declination info or write it on your map case so you’re not guessing when your hands are cold and your attention is split.
Your body is part of the system
Your pace length changes with fatigue, load, terrain, and stress. That’s not a flaw-it’s reality.
Instead of pretending you’ll always walk the same, build multiple pace counts (flat, uphill, downhill, rough ground). Then choose the one that matches what you’re actually doing.
This is also why movement technique matters. If you’re crossing unstable slopes, your stride changes dramatically. Review traveling safely on loose terrain and treat it as part of your navigation accuracy, not separate from it.
Establishing Your Baseline Pace Count on Multiple Terrain Types
If you want pace count to mean anything, you need numbers built from real walking-not guesses. Do this once carefully and you’ll have a tool you can update over time.
Think of pace count as calibration. You’re building a measurement system that still works when the environment stops cooperating.
The 100-meter method (and why it works)
The standard approach is measuring your paces over 100 meters, then converting as needed. One reason the 100-meter distance is used is that it’s long enough to smooth out small inconsistencies.
Here’s a clean setup:
- Measure a 100-meter line with a tape, GPS (in good conditions), or a track with known markings.
- Walk it at a normal movement pace with your typical pack weight.
- Count every time your left foot hits (or right-just be consistent).
- Repeat at least 3 times and average the results.
Quick reference: Most people count every time the same foot hits the ground. That means your “paces” are actually double-steps. Don’t mix definitions mid-trip.
Build separate counts for terrain that breaks your stride
If you only build a flat-ground pace count, you’ll be wrong when it matters. You need at least three baselines:
- Flat / gentle grade
- Uphill (sustained climb)
- Downhill (sustained descent)
Add a fourth if you spend time off-trail:
- Rough ground (rocks, brush, deadfall, snow)
Your pace count typically increases uphill and in rough terrain because your stride shortens. Downhill can go either way: you might lengthen stride on smooth descents, but shorten it on steep or unstable ground.
Convert map distance to pace count without mental gymnastics
Keep conversions simple. If your flat-ground count is 62 paces per 100 meters, then 500 meters is about 310 paces.
A clean practice is to write expected paces for each leg directly on your route card or map margin. In low visibility, you don’t want to do long division while cold, wet, and stressed.
If you’re building a broader kit around these skills, it’s worth browsing backpacking skills essentials and treating navigation like any other system you train-not a trick you hope to remember.
Counting Methods That Survive Stress, Darkness, and Fatigue
Counting in your head sounds easy until you’re soaked, breathing hard, and stepping over deadfall. Your counting method has to survive real conditions.
This is where people quietly fail. They know the concept, but their process falls apart once the terrain starts demanding attention.
Bead counters vs. mental counting vs. time pacing
You’ve got three common approaches:
| Method | Strengths | Weaknesses | Best use |
|---|---|---|---|
| Ranger beads (pace counter) | Hard to forget, easy to audit | Can snag, easy to mis-click if rushed | Night, heavy stress, long legs |
| Mental counting (e.g., 1-100 loops) | No gear required | Easy to lose count when distracted | Short legs, low complexity |
| Time pacing (minutes per km/mi) | Useful on trails, skis, snowshoes | Speed changes with terrain, fatigue | Known routes, consistent surfaces |
If you’re moving cross-country with obstacles, beads win. They keep you honest when you’re forced to stop, detour, or manage a minor problem.
The “chunking” technique that reduces errors
Even with beads, chunk your movement. Instead of trying to walk 900 meters in one mental push, break it into 100-meter chunks.
At each chunk, do a quick micro-check:
- Is my bearing still correct?
- Did terrain force drift?
- Am I moving the way I planned (handrail/backstop still valid)?
This is where land-nav discipline pays off. You don’t wait until you’re lost to think. You think on schedule.
Counting while managing movement and safety
Low visibility navigation often happens in bad footing. If you have trekking poles, treat them as stability tools, not just comfort.
If you want a good breakdown of bracing and self-belay mechanics, see trekking pole techniques for steep and unstable ground.
The less you slip, the less your stride gets chaotic. And the more consistent your stride is, the more your pace count stays meaningful.
Dead Reckoning Legs: Planning, Executing, and Verifying Each Segment
Dead reckoning works best when you treat movement like a series of legs, not one long wander. Each leg has an azimuth, a distance, and a verification plan.
Once you start thinking in legs, you stop feeling like you’re “out there guessing.” You’re simply executing a plan and checking your work.
Build legs that are easy to confirm, not just direct
The straight line is not always the smart line. If you can route your leg to hit a linear feature (trail, creek, road) at a known angle, you create a predictable confirmation point.
For example, instead of trying to walk 1,200 meters through timber to a small knoll, you might walk 800 meters to intentionally intercept a creek. Then you follow it (handrail) 400 meters to a distinct bend.
This is not “cheating.” It’s building a plan that survives human error.
Route card essentials you can build in two minutes
A route card doesn’t need to be fancy. For each leg, write:
- Start point (known feature)
- Azimuth (magnetic or grid-be consistent)
- Distance (meters) and expected paces
- Expected intermediate features (optional)
- Backstop (what tells you you’ve gone too far)
Quick reference: If you can’t describe what “too far” looks like, you’re not dead reckoning. You’re guessing with a compass.
Verify at logical checkpoints, not random moments
Verification is where people get lazy. They walk, then check the map when they feel uncertain. That’s backwards.
Instead, verify at planned points: every 100-200 meters in complex terrain, or at every terrain change (creek crossing, slope break, vegetation boundary).
If your plan says you should cross a shallow draw at 400 meters and you don’t, stop and diagnose before the error grows. Small errors are manageable. Big errors are time-consuming and stressful.
Distance Correction Tools: Slope, Detours, and Micro-Terrain Drift
Your pace count is never “wrong” by itself. It’s wrong because conditions changed. The fix is not denial; it’s correction.
Think of corrections as part of the plan, not a sign you failed.
Slope correction: why your map distance lies to your legs
Map distance is horizontal distance. Your legs walk slope distance. On mild slopes, the difference is small; on steep climbs, it becomes noticeable over longer legs.
A practical field approach is to maintain separate pace counts for uphill and downhill, then select the count that matches the dominant grade.
If the terrain alternates constantly, accept a small error and lean harder on verification features. Another option is to plan shorter legs. The shorter the leg, the smaller the cumulative slope error.
Obstacle detours: boxing without losing the plot
In real terrain, you rarely get a clean line. Blowdown, cliffs, private property boundaries, water obstacles-something eventually forces you off your bearing.
The reliable technique is boxing:
- Turn 90 degrees off your azimuth.
- Pace a measured distance to clear the obstacle.
- Turn back parallel to your original azimuth and continue past the obstacle.
- Turn 90 degrees back and pace the same distance to regain your original line.
Write the detour paces down immediately. If you “remember it,” you’ll remember it wrong.
Micro-drift: the error you don’t feel
Even when you think you’re holding an azimuth, you drift. People favor a leg, avoid brush subconsciously, or angle around rocks.
This is why handrails matter. If your route parallels a creek on your left, you can drift a little and still know your general position.
Without a handrail, drift becomes a slow-motion failure. You don’t notice it until you miss the feature you expected.
Azimuth Discipline: Holding a Line Without Landmarks
When visibility is poor, you can’t pick a far tree and walk to it. You need techniques that work inside a smaller bubble.
This is where “good enough” navigation quietly turns into a miss.
The “short aim point” method in fog and timber
In fog, your aim point might only be 20-40 meters away. That’s fine.
Set your bearing. Find the best visible object on that line (a stump, rock, darker tree trunk), walk to it, then repeat.
This is slow but accurate. The mistake is rushing and accepting “close enough.” In tight visibility, close enough becomes a big miss after several repetitions.
Leapfrogging with a partner (and why it’s so effective)
If you’re traveling with someone, leapfrogging is one of the most accurate ways to hold a line.
Use a simple workflow:
- Person A stands on the bearing with the compass.
- Person B walks forward until A signals they are on line.
- B stops and holds position.
- A walks to B and repeats the process.
This reduces drift because only one person is making the “on-line/off-line” call. It also gives you a built-in pause point to verify pace count, check terrain, and catch small mistakes before they stack.
If you’re doing this at night, use low light and clear communication so you don’t blow your night vision or introduce confusion under stress.