Cold Weather Layering System for Grid-Down Operations: Thermal Management, Moisture Control, and Extremity Protection
When temperatures drop and the power grid fails, your clothing system stops being a comfort consideration and becomes mission-critical life support. Hypothermia can incapacitate a healthy adult in under two hours in wet, windy conditions — and in a true grid-down scenario, there’s no emergency room waiting at the end of the trail. The layering system you build before a crisis determines whether you remain operationally effective or become a liability.
This guide is written for operators, preppers, and serious outdoor practitioners who need a cold weather clothing architecture that performs across extended durations — not just a weekend camping trip, but sustained multi-day or multi-week operations in environments where resupply is impossible and failure is not recoverable.
Core architecture principle — three problems, one system:
— Conductive loss: Cold surfaces pull heat from your body — blocked by insulating air layers
— Convective loss: Wind strips your warm air boundary layer — blocked by the outer shell
— Evaporative loss: Moisture evaporation consumes body heat — managed by wicking base layers and vapor transmission
A properly engineered layering system addresses all three simultaneously. No single garment — regardless of how technically advanced — can replace a complete, modular system. The three failures above are why.
Understanding the Thermal Management Problem
Most people think cold weather clothing is about staying warm. That’s only half the equation. The real challenge is managing the dynamic relationship between heat generation, moisture production, and external temperature — a relationship that shifts constantly as your activity level changes.
When you’re moving fast through terrain — patrolling, hauling gear, or evacuating — your body generates significant heat and sweat. Stop for an observation post or a rest break, and that moisture-soaked clothing becomes a refrigeration system. This cycle of overheating and chilling is responsible for more cold weather casualties than raw temperature alone. Your system must be designed to adapt as fast as your activity level does.
The three thermal failure modes
Activity level and the dynamic heat equation
Your layering system must be designed to adapt, not just insulate. During high-output movement, you need to vent excess heat and evacuate moisture rapidly. During static periods, you need to trap that heat aggressively. This means your system requires easy on/off capability, accessible venting, and enough modularity to reconfigure in under two minutes — ideally with gloves on. A system that cannot be adjusted quickly is a system that will fail under the dynamic conditions of real operations.
The Three-Layer Architecture
The military and mountaineering communities converged decades ago on a three-layer framework that remains the gold standard for cold weather thermal management. Each layer has a specific function, and understanding those functions allows you to make intelligent substitutions when ideal gear isn’t available. In extended operations, you’ll often add a fourth layer — a dedicated insulation puffy — between the mid and outer layers for extreme cold, creating a four-layer system.
Base layer — moisture management foundation
Your base layer is in direct contact with your skin and its sole job is moving moisture away from your body surface before it can chill you. This is called wicking, and it is the single most important function in your entire system. Two materials dominate serious cold weather base layers, and choosing between them is one of the most operationally significant decisions in your kit build.
- Regulates temperature naturally — insulates when damp, cools when hot
- Resists odor after multiple days without washing — critical in extended off-grid scenarios
- Retains meaningful insulation even when wet — does not collapse completely
- More comfortable against skin during prolonged wear than most synthetics
- Slower to dry than synthetic — a meaningful limitation in high-sweat scenarios
- Brands: Smartwool, Icebreaker — worth the investment for sustained operations
- Wicks moisture faster than wool — better performance at peak sweat output
- Dries significantly faster — critical when drying windows are short
- Lower cost — more practical for building two-set redundancy
- Odor accumulates over multiple days — requires more frequent washing
- Slightly reduced wet insulation compared to merino
- Often layered under merino in extreme cold for best of both wicking rates
Never use cotton as a base layer in cold weather. Cotton absorbs moisture and holds it against your skin, functioning as a cold compress rather than insulation. This is why it’s sometimes called “death fabric” in survival communities — not as hyperbole, but as an accurate description of the thermal failure mode it produces. No cotton base layers, no cotton socks, no cotton underlayers of any kind.
Mid Layer: Insulation Technology and Selection
The mid layer’s function is insulation — trapping the heat your body generates within a network of air pockets that resist thermal transfer. The two primary mid layer technologies are down insulation and synthetic insulation, and each has specific operational strengths that determine which is the right choice for your mission profile.
| Factor | Down Insulation | Synthetic Insulation | Fleece |
|---|---|---|---|
| // Warmth-to-Weight | Best available — fill power 550–900+ | Good — heavier for equivalent warmth | Moderate — bulkier than both |
| // Wet Performance | Critical failure — loses up to 90% insulation when saturated | Retains 60–80% insulation when wet | Insulates when damp, dries rapidly |
| // Dry Speed | Slow — requires heat and mechanical action to restore loft | Moderate — faster than down | Fast — best drying rate of the three |
| // Pack Volume | Compresses exceptionally — smallest packed size | Good compression — larger than down | Bulkiest — does not compress well |
| // Breathability | Low — not suitable for high-output movement | Low-moderate — better than down, still limited | High — best choice for active movement |
| // Operational Role | Static positions, sleeping, emergency insulation layer — deploy at stops | Primary insulation in wet climates, sustained field use | Active movement mid layer, high-exertion insulation |
| // Wet Condition Rec. | Use only with DWR-treated hydrophobic down (Responsible Down Standard) | Primary choice — PrimaLoft, Thinsulate, Polartec Alpha | Reliable — standard fleece or Polartec 200/300 |
For operators who cannot guarantee dry conditions, synthetic mid layers are the more reliable operational choice. Down remains superior for weight-critical builds and static cold scenarios — but it requires the discipline to keep it dry through strict layer management and dry-bag storage. Fleece earns its place as the default active-movement mid layer precisely because its breathability and fast-drying properties match the demands of dynamic activity better than either insulation type.
Outer Shell Selection for Tactical Operations
Your outer layer is the interface between your thermal system and the environment. It must block wind, shed precipitation, and allow moisture vapor from your inner layers to escape — a combination of properties that creates fundamental engineering trade-offs between protection and breathability.
Hardshell vs softshell — operational trade-offs
Hardshell jackets use waterproof-breathable membranes (Gore-Tex, eVent, proprietary equivalents) laminated to face fabrics, creating a barrier that blocks liquid water while allowing water vapor to pass through. They offer maximum weather protection in rain, sleet, and wet snow. The trade-off is reduced breathability under high exertion — under sustained movement, hardshells can build up significant internal moisture from sweat vapor that cannot escape fast enough.
Softshell jackets sacrifice some weather resistance for dramatically improved breathability and freedom of movement. They’re ideal for high-output activities in dry cold or light precipitation. For sustained grid-down operations across variable conditions, the optimal solution is carrying both: a softshell for active movement and a hardshell for static positions, severe weather, or overnight use.
Key features for tactical cold weather jackets
Hood compatibility with helmets and load-bearing equipment is essential — a hood that collapses under a helmet or interferes with a headlamp is operationally useless. Pit zips (underarm ventilation zippers) allow rapid heat dumping during high-exertion movement without removing the layer. Handwarmer pockets positioned above a pack hipbelt ensure accessibility while carrying a loaded ruck. Reinforced elbows and shoulders resist abrasion from gear contact during extended wear.
DWR (Durable Water Repellent) coatings on face fabrics prevent the outer layer from saturating and adding weight while maintaining breathability. DWR degrades with use and washing — carry a field-reapplication spray (Nikwax TX.Direct or Gear Aid Revivex) in your kit for extended operations, and reactivate by applying body heat or careful proximity to a heat source.
The Four-Season Layer Stack Reference
For genuine extended off-grid operations in cold weather, the table below presents a complete layer stack organized by condition and activity level. The key operational principle is to always carry one layer more than you think you need. In a grid-down scenario, you cannot predict when your activity level will drop — an injury, a forced static position, or an unexpected weather event can shift your thermal requirements within minutes.
| Condition | Base | Mid Layer | Insulation | Shell |
|---|---|---|---|---|
| Active / 20–40°F | Synthetic base | Light fleece | — | Softshell |
| Active / 0–20°F | Merino + synthetic | Mid-weight fleece | Synthetic puffy | Hardshell |
| Static / 20–40°F | Merino base | Heavy fleece | Down puffy | Hardshell |
| Static / Below 0°F | Merino + synthetic | Heavy fleece | Down puffy | Hardshell + wind layer |
| Sleeping / Any temp | Merino base | — | Bag rated to –20°F | Bivvy or shelter |
The start-cold rule: If you’re comfortable at the start of a movement, you’re overdressed. You should feel slightly cool when you begin moving — your body heat output will bring you to thermal equilibrium within five minutes. Dress for the activity, not the ambient temperature. This single rule prevents more cold weather moisture problems than any piece of gear.
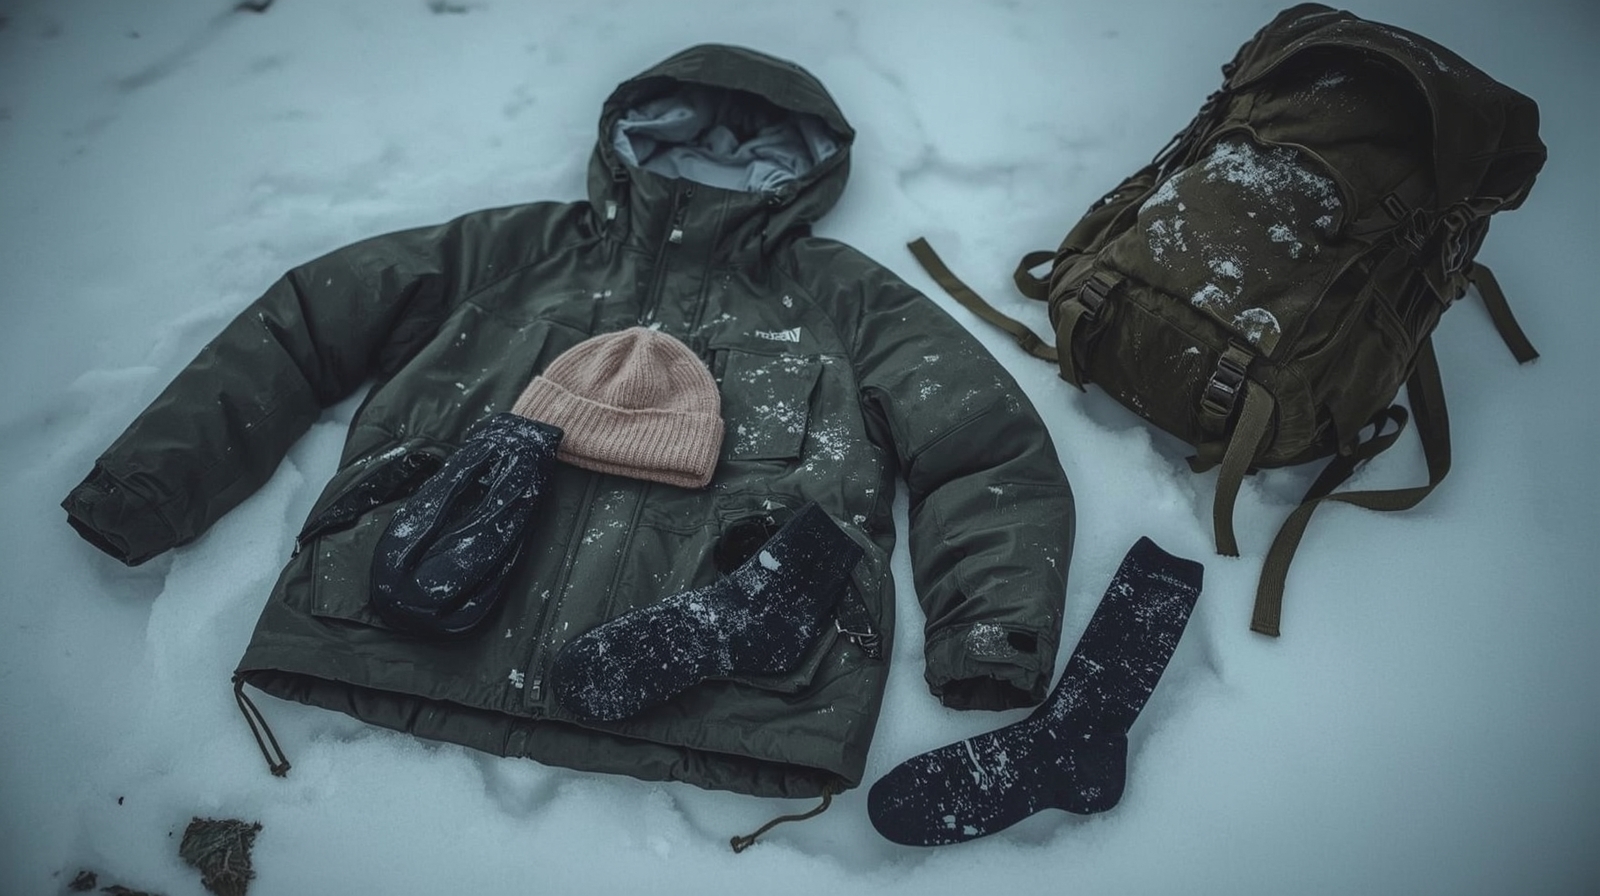
Extremity Protection: Hands, Feet, and Head
Core temperature management is the foundation of your layering system, but extremity protection determines your operational capability. Cold hands cannot manipulate equipment, start fires, or apply first aid. Cold feet cause mobility loss that compounds into safety failures on difficult terrain. Heat loss through an uncovered head can equal 30–40% of total body heat output in extreme cold.
Hand layering system — three-tier architecture
Foot system for extended winter operations
- Liner sock (synthetic or merino) against the skin — wicks moisture away from skin surface
- Mid-weight insulating sock over the liner — traps heat while the liner manages moisture
- Never use cotton — same “death fabric” rule applies to feet as to base layers
- Carry a minimum of three pairs per 24-hour period in extended operations — a U.S. Army cold weather doctrine standard
- Dry sock changes prevent trench foot — the most common preventable cold weather injury after frostbite
- 200g: Light insulation — active movement above 20°F, best breathability
- 400g: Moderate — active to moderate movement, 0–20°F range
- 800g: Heavy — mixed movement and static use, well below 0°F
- 1000g+: Extreme cold static positions — maximum warmth, minimal breathability
- For active movement, lower gram ratings with quality wicking socks often outperform over-insulated boots that trap sweat
- For static positions or extreme cold, err toward higher gram ratings regardless of breathability sacrifice
Head and neck thermal management
A balaclava provides the most versatile head protection available — it covers the neck, face, and head in a single garment and can be worn as a neck gaiter when full coverage isn’t needed. Merino wool balaclavas are preferred for extended wear due to odor resistance and skin comfort. A watch cap or beanie worn over a balaclava dramatically increases warmth retention. For extreme cold, a helmet liner that incorporates ear coverage and integrates with your outer hood creates a complete thermal seal around the head — eliminating the most significant heat loss pathway in the body.
Managing Moisture in Extended Operations
Moisture management is the most technically demanding aspect of cold weather layering because moisture is generated continuously — through sweat, respiration, and environmental precipitation — and must be moved outward through every layer of your system simultaneously.
The vapor transmission architecture rule
For moisture to migrate outward from your skin to the environment, each successive layer must be more breathable than the layer beneath it — or at minimum, must not create a vapor barrier that traps moisture between layers. This is why stacking multiple waterproof layers is counterproductive: moisture vapor hits the inner waterproof barrier and condenses back into liquid, saturating your insulation from the inside. The Wilderness Medical Society identifies wet insulation as a primary contributing factor in backcountry hypothermia cases — this architectural principle is why.
The correct architecture always places waterproofing at the outermost layer only, with all inner layers optimized for vapor transmission. This is not a preference — it’s the structural requirement of the system.
Venting protocols for dynamic activity
Develop a disciplined venting protocol before you need it. The standard military approach is to vent aggressively before you start sweating — open pit zips, unzip the collar, and if necessary remove a layer — rather than waiting until you’re already wet. Once moisture has saturated your insulation, drying it in field conditions without a dedicated heat source is extremely difficult and takes far longer than the next movement phase typically allows.
Venting sequence — execute before you feel hot:
— Collar first: unzip to base of neck to release accumulated heat
— Pit zips second: open both underarm vents for convective venting
— Front zip third: partially unzip shell for direct airflow to core
— Layer removal last: only if the above are insufficient and you have a secure location to stow
The correct signal to vent is beginning a significant uphill or load-increase, not feeling warm. Vent at the start of the effort, not the end of your tolerance.
Common Layering Mistakes That Get People Killed
Even experienced operators make predictable errors in cold weather layering that compound into dangerous situations over extended operations. Each failure below follows the same pattern: a decision that seems reasonable in the moment, with consequences that only become visible hours later when correction is difficult or impossible.
Gear Maintenance and Field Repair for Sustained Operations
A layering system is only as good as its condition after days or weeks of continuous use. Building maintenance protocols into your operational routine extends the functional life of your gear and prevents equipment failures at the worst possible times.
DWR reactivation and shell maintenance
DWR coatings can be partially reactivated by applying gentle heat — body heat from wearing the garment, or careful proximity to a fire or camp stove. The heat realigns the DWR molecules, temporarily restoring water repellency. For longer-term restoration, carry a small bottle of spray-on DWR treatment — Nikwax TX.Direct or Gear Aid Revivex — in your kit. Apply to clean, damp fabric and allow to dry completely before use. Carry seam sealer for delaminating waterproof seam tape, a common failure point in heavily used hardshells.
Down insulation emergency drying
If your down insulation becomes wet in the field, the priority is restoring loft as quickly as possible. Spread the garment in any available sunlight and periodically shake and redistribute the down clusters manually — they clump when wet and must be physically separated to dry. Body heat from wearing the damp garment while active can accelerate drying. A small amount of controlled fire heat at safe distance helps — never apply direct flame or excessive heat, which will melt synthetic shell fabrics and permanently damage down clusters.
Field repair kit essentials
Carry Tenacious Tape (or equivalent fabric repair tape), a needle and thread, and seam sealer. A fist-sized tear in an outer shell layer in a blizzard is a life-threatening equipment failure. Tenacious Tape can seal a tear in under 60 seconds and restore weather resistance immediately — it requires no tools, works on wet fabric, and holds under sustained wind and rain. The repair kit adds under two ounces to your pack weight; the cost of not having it is measured in different terms.
Building a Grid-Down Cold Weather Kit
In a genuine grid-down scenario — whether triggered by infrastructure failure, geopolitical disruption, or natural disaster — your cold weather kit must be self-contained, repairable, and designed for indefinite duration without resupply. This changes the selection criteria compared to a planned expedition. The FEMA emergency preparedness framework recommends a 72-hour baseline — serious operators and preppers should design for 30+ days, which means different materials, more redundancy, and field repair capability built into every layer.
- Smartwool Intraknit 250 (top + bottom)
- Icebreaker 260 Tech crew set
- Minus33 midweight base layer
- Patagonia R2 Polartec 200
- Arc’teryx Kyanite AR fleece
- Outdoor Research Vigor Grid fleece
- Arc’teryx Atom AR (Coreloft synthetic)
- Patagonia Nano-Air (Polartec Alpha)
- REI Stormhenge 850 down hybrid
- Arc’teryx Beta AR (Gore-Tex Pro)
- Outdoor Research Foray II
- Marmot Minimalist — budget tier
- Liner: Outdoor Research ActiveIce gloves
- Mid: Hestra Army Leather patrol glove
- Mitt: OR Alti Mitts or OR Extravert
- Darn Tough full-cushion hiking crew
- Smartwool PhD Outdoor Heavy crew
- Icebreaker Hike+ heavy cushion
- Minus33 merino full balaclava
- Smartwool convertible balaclava
- Icebreaker Oasis balaclava
- Gear Aid Tenacious Tape (2× sheets)
- Nikwax TX.Direct spray-on DWR
- Gear Aid Seam Sure seam sealer