Camouflage and Concealment in the Backcountry: Site Discipline, Natural Material Integration, Shine/Silhouette Control, and Smoke Management
Operational Reality Check: You Are Always Broadcasting
In the military, camouflage and concealment are not cosmetics — they are information control. In the backcountry, the stakes shift depending on context: avoiding unwanted attention, reducing conflict risk in high-use areas, or simply keeping your camp from becoming a beacon at night. The principles are identical. The consequences are different in degree, not in kind.
Here is the hard truth: most people fail concealment because they focus on pattern and color, and ignore signature. Signature is what gives you away at distance and under stress. Your biggest giveaways are shine, silhouette, movement, contrast, and smoke — in roughly that order of frequency. Noise and track sign are close behind.
This guide is written like a field brief because that is how you should treat the problem. You will make fewer mistakes following a repeatable system: pick the right site, control your routine, integrate natural materials correctly, kill shine, break shape, and manage smoke like it can get you found — because it can.
Control sequence — this order, every time:
— Site first: terrain and background do more work than any gear you carry
— Signature second: shape, shine, silhouette, contrast, movement — address all five
— Routine third: light discipline, noise, traffic patterns, and camp bloom
— Material last: natural augmentation that adds to a good setup, not fixes a bad one
Your camo pattern does not matter if your shine, silhouette, and light discipline are wrong.
Pick the Ground Like It Matters: Site Selection With Consequences
Your best camouflage is a smart site choice. A bad site forces you to work harder and still fail. When you select a location, you are deciding what angles you can be observed from, what background you will be silhouetted against, and how your smoke and light will travel. These decisions are essentially irreversible once you’re set up — get them right before you unpack anything.
Use terrain like cover, not decoration
Think in terms of observation points: ridgelines, trail corridors, river bends, open meadows, rock outcrops, and any place a person naturally pauses to look. Do not camp where people look. Camp where people pass through without scanning.
- Avoid skylining: ridgelines, knobs, and slope crests. Even a small tent becomes obvious against open sky at any distance.
- Use reverse-slope positioning: set back from the crest so you are hidden from the far side and wind is less direct.
- Exploit micro-terrain: shallow depressions, benches below a rise, the lee side of boulders, and thick vegetation edges. These require no augmentation — the terrain does the work.
Control lines of sight and human funnels
Trails, game paths, and drainages funnel movement. If you camp inside a funnel, you will get eyes on you. Offset from these routes and use vegetation or terrain to break the sightline. Distance alone is not concealment — a headlamp flash in dark timber is visible a kilometer away. Focus on angles and background, not just meters of separation.
Wind and smoke are part of site selection
If you plan to cook or run any flame, consider prevailing wind and the terrain’s chimney effect before you commit to a spot. Valleys channel smoke. Saddles accelerate and redirect wind. Cold air drains downhill at night and carries odor and smoke in predictable, repeatable flows that other people in the area will notice before they see you.
If you need a solid reference on how wind and cold affect cooking systems, read the guide on cold-weather stove and fuel management. Faster cook times mean a shorter exposure window.
Don’t hide in terrain that creates a new hazard. A low bowl or drainage offers concealment but can flash-flood, cold-soak you overnight, or trap smoke under inversion layers. Concealment that compromises survival is not a tactical advantage — it is a delayed emergency with extra steps.
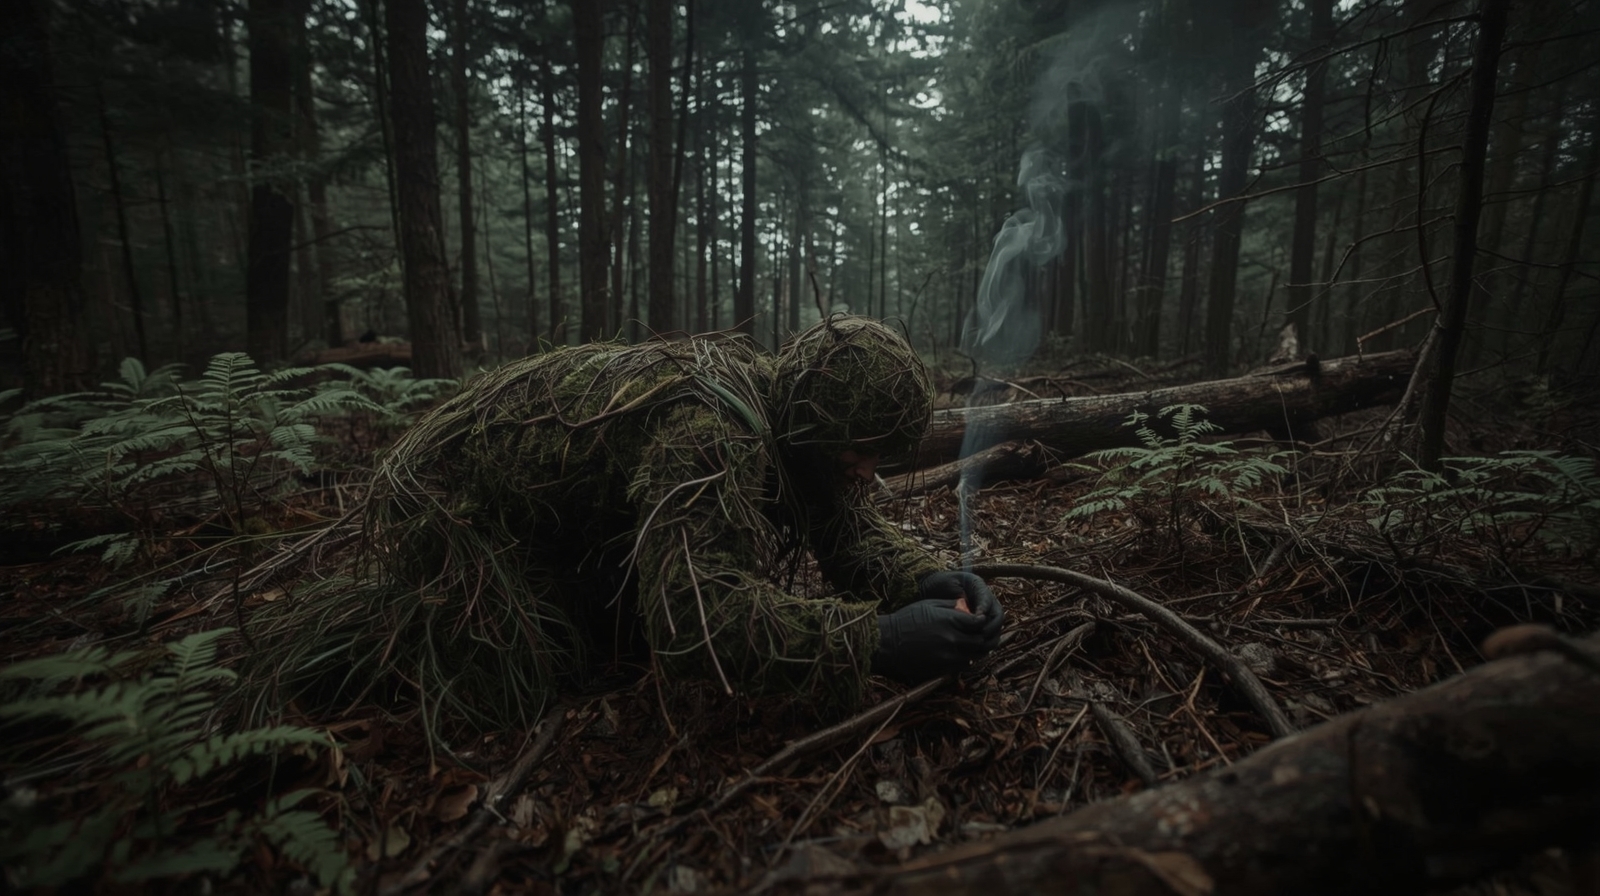
Signature Management: What Actually Gets You Spotted
If you remember one section from this guide, let it be this one. Most detection is not a matter of someone seeing your exact color. The brain detects anomalies: straight lines in organic terrain, sharp edges, unnatural shine, repetitive shapes, and movement that does not match the environment. You are not trying to become invisible — you are trying to stop looking like something that does not belong.
The five primary signatures — and how to counter each
Secondary signatures — also controlled, not ignored
| Signature | How It Gives You Away | Field Control |
|---|---|---|
| Light | Headlamps, phone screens, stove flame, and fire glow are visible at extreme range at night | Lowest setting. Shield with body. Red light for nav tasks. No beam sweeps. |
| Sound | Metal-on-metal clinks, Velcro tears, and loud conversation travel far in still night air | Tape hardware before dark. Stage gear to avoid nocturnal digging. Work noisy tasks early. |
| Odor | Food smells, smoke, and hygiene items create scent plumes — obvious to wildlife, noticeable to humans downwind | Cook downwind of sleep sector. Bag food properly. Use unscented hygiene products in sensitive areas. |
| Sign | Trampled vegetation, cut branches, soil disturbance, and visible trash communicate “occupied” to anyone passing | Minimize ground disturbance. Vary foot routes. Never leave visible waste. Pack out every scrap. |
Counter-tracking is its own discipline, but it overlaps heavily with sign management. For the deeper playbook on managing track sign, route choice, and terrain masking, read the guide on counter-tracking and anti-tracking in the backcountry.
Camp Setup SOP: Stop Camp Bloom Before It Starts
“Camp bloom” is what happens when your footprint expands unchecked: gear spread out, bright items exposed, repeated movement polishing visible paths, and food scatter creating animal activity that draws attention at night. In training, you shut this down with routine. The same discipline works in the backcountry — and it takes maybe five minutes of deliberate setup to prevent hours of signature leakage.
Establish sectors — even solo
Separating tasks into sectors is not about feeling tactical. It reduces noise, odor, and visible disturbance from being concentrated in one obvious spot — which is exactly the kind of anomaly that draws attention from trail users, wildlife, and anyone else in the area.
- No food handling — ever
- No bright light sources
- Minimal ground disturbance
- Sheltered from primary observation angles
- Downwind of sleep — always
- Quick access to water for emergency
- Smoke plan confirmed before lighting
- Stove packed immediately after use
- Approach route varies — no worn trail to water
- Avoid compressing mud or bank vegetation
- Treat water back at cook sector, not at source
- No contamination within 60m of water source
- Follow local regulations — know them before you go
- 200 feet minimum from water, trails, camp
- Pack out all solid waste where required
- No waste visible or accessible from camp
Food storage is part of concealment because it prevents animal activity that creates noise and visible sign at night. For a disciplined workflow that reduces both animal risk and camp signature, review the guide on bear-proof camp food storage and scent control.
Control movement: fewer trips, cleaner ground
Every repeated step creates a visible line. The fix is simple: plan your tasks, stage what you need, and make fewer loops. When you must move, vary your route slightly so you do not wear a trench between your shelter and the water source.
- Stop before unloading. Scan the area, confirm angles, confirm background, confirm your sector layout before anything comes out of the pack.
- Stage gear on a groundsheet. Muted color. One pile, not scattered. Keeps gear off wet ground and keeps your footprint from the first minute.
- Set shelter fast, then stow immediately. Packaging, bright-colored stuff sacks, and anything with shine goes inside within the first few minutes.
- Establish one clean entry/exit. One deliberate path in and out of the sleep sector. Everything else is approached from varying angles to prevent trail formation.
Light discipline: the fastest way to lose concealment
At night, a headlamp is a flare. Use the lowest setting that allows safe work. Shield light with your body, point it at the work surface rather than sweeping it across terrain, and avoid illuminating tree lines or open ground above waist height. A phone screen inside a tent at night is visible from far away through thin shelter fabric — dim it and keep it under a jacket or inside your sleeping bag when checking it.
In group settings, pre-staged communication reduces the need for both light and loud voices after dark. If you operate with partners, a basic set of hand-and-arm signals for silent team movement eliminates most of the nighttime noise problem entirely.
Natural Material Integration: Blend In Without Advertising Your Camp
Natural material integration is not “throw branches on your tent.” Done wrong, it becomes a worse giveaway than doing nothing: freshly cut green boughs, broken vegetation, and a shape that looks like a child tried to hide a vehicle with leaves. The environment immediately around a good camp should look undisturbed — because it largely is.
Rules of thumb for natural augmentation
- Match what is already dead. Deadfall, leaf litter, and naturally downed material blend because they belong to that terrain at that time of year. Freshly cut material does not — the exposed wood and wilting leaves scream human activity.
- Do not overbuild. Too much accumulated material creates an unnatural mound shape. Your objective is disruption of edges and reduction of contrast — not burial.
- Avoid fresh cuts entirely in sensitive areas. Any exposed cambium or bright inner wood is a visible marker. In high-use or protected areas, do not cut living vegetation at all.
- Respect Leave No Trace. Your concealment plan cannot be “strip the area.” These principles are not in conflict — low-impact concealment is better concealment, because it leaves less sign of your presence.
Break straight lines and large panels
The goal is to disrupt the edges the eye detects from distance: the long ridge of a tarp, the arc of a tent pole, the hard rectangle of a pack. Use scattered, irregular pieces to create visual noise. Think shadow and texture interruption, not coverage. A few irregularly placed pieces of deadfall along the ridgeline of a tarp do more work than armloads of debris heaped against the sides.
For tarps, pitch geometry matters as much as color. A low storm pitch reduces both silhouette and light leak. For storm-capable low-profile pitches that hold under wind and heavy rain, reference the guide on tarp shelter systems for wind and heavy rain.
Blend with the background, not just the ground
Most people decorate the shelter but ignore the backdrop. If your shelter is against a uniform wall of dark timber, the job is already 80% done. If it is against a bright rock face or open meadow edge, you will fight contrast all day regardless of what you put on the shelter surface.
Position the largest visible face of your shelter against the dominant background texture. In mixed terrain, orient the shelter so the most visible side aligns with the best-blending background as seen from the most likely observation angle — trail, water source, ridgeline.
Shine Control: Kill Reflections Before They Kill Your Position
Shine is betrayal by physics. Light hits a reflective surface and travels in a predictable direction — straight to whoever is standing at that angle. In the field, shine is treated like noise: if you can see it, someone else can too. The difference between shine and other signatures is that shine works at range and in conditions of low ambient light where nothing else would give you away.
Common shine sources in civilian backcountry kits
Do the 30-meter walk at dusk. Walk 30–50 meters from camp and look back from the most likely approach angle — trail, ridge, or water. At dusk and dawn, when sun angles are low, any reflective surface will flash immediately. If anything catches your eye, fix it before dark. A shine problem found at dusk is easy. One found by someone approaching your camp at 0600 is not.
Reversible methods first — always. Some coatings reduce cookware safety and some adhesives affect fabric DWR. Use matte cloth tape for a non-permanent, field-removable option.
Noise and Micro-Discipline: The Signature Everyone Ignores Until It Fails
You can be visually concealed and completely compromised by sound. Zippers, metal-on-metal hardware, and task chatter travel farther than you expect — especially at night in a still valley when ambient noise drops to near zero. Treat noise like light: control it at the source, not after it happens.
Common noise failures in camp
- Hardware rattle: loose carabiners, pot handles, trekking pole tips against rock, and bear-hang kits clanging during setup. All of these are visible and audible far beyond your camp perimeter.
- Velcro and zippers: fabric-tearing sounds that cut through timber like a signal. Velcro in particular carries disproportionately far in still air.
- Repeated task noise: pumping water filters, chopping wood, or moving rocks after dark — any repetitive mechanical sound announces both your presence and your activity to anyone in range.
Field fixes that keep you quiet
Before last light, tape or tie down anything that rattles. Stage your night gear — headlamp, water, anything you might need between dark and dawn — so you are not digging through a noisy pack at 0200. If you have noisy work to do, do it once, do it during the day, and do it at the farthest reasonable distance from your sleep sector. Batch task consolidation — doing everything in one session rather than repeated trips — is the single most effective noise reduction tactic available.
Pre-dark noise reduction checklist:
— All loose hardware taped, tied, or stowed
— Night gear staged and accessible without digging
— Water filter completed before last light
— Cook sector stove packed, fuel secured
— No pending chopping, splitting, or heavy work
Silhouette and Shape: Stop Looking Like a Human and a Tent
Silhouette is what gets you detected at distance and in marginal light conditions. People register outlines before they process color. Your job is to avoid being framed against high-contrast backgrounds, and to disrupt the recognizable geometry of your shelter, pack, and body — without creating an artificial mound shape that is equally unnatural.
Anti-skylining: enforce it every time, without exception
Never rest, cook, or set shelter at the highest point in an area just because it is flat or has a view. The view works both ways. Use the reverse slope, stay back from the crest by at least 15–20 meters, and avoid moving on the skyline during sunrise and sunset when contrast is at its highest. This applies to brief stops as much as overnight camps — a silhouetted figure on a ridgeline is memorable to anyone who sees it.
Break the tent triangle and tarp rectangle
- Edge disruption: add irregular texture along the ridgeline using naturally placed deadfall and debris. You are not covering the shelter — you are interrupting the clean geometric edge that the eye catches.
- Shadow management: avoid creating a stark dark void under a high tarp pitch. Lower pitches reduce both silhouette height and the “cave” shadow pattern that reads as artificial from distance.
- Color discipline: a bright shelter demands compensation through better site selection and canopy cover. You cannot fix a high-vis tent with natural augmentation alone — the site has to do that work.
Human shape control: posture and movement
Standing upright in an opening — especially against sky or open ground — is the highest-visibility human position. Work low: kneeling, seated, or crouching reduces your visual footprint by over half. Slow, deliberate movement is nearly invisible through brush even at close range. Sudden arm motions are visible through vegetation even when the body behind them is not.
When you must cross open ground, move along terrain edges: the boundary between timber and meadow, shadow lines cast by terrain folds, and the low ground between rises. Do not cross the center of an open area unless you have no choice and have checked both ends of the approach corridor first.
Contrast and Color: Match the Season, Not Your Preference
Contrast is the mismatch between your gear’s tone and the surrounding environment — either in brightness (too light or too dark) or in color temperature (cool gray in warm brown woods, saturated green in dry autumn terrain). You do not need perfect pattern matching to reduce contrast. You need to avoid the extremes, because extremes are what the eye catches.
Seasonal contrast traps — and how to sidestep them
Color temperature and warm-cool mismatch
Experienced observers pick up color temperature mismatch faster than brightness mismatch. A cool-gray rain jacket in warm-toned autumn woods stands out even at low contrast because the color temperature is wrong for the environment — like a light source that “doesn’t belong.” Matching the warmth or coolness of the dominant palette matters as much as matching the overall darkness or lightness.
Practical gear color selection for low visibility
- Muted earth tones (ranger green, flat dark earth, coyote, brown) are the lowest-signature option across the widest range of environments and seasons.
- Avoid high-saturation colors in the backcountry — blaze orange is legally required for hunters in many areas for exactly this reason: it is detectable at range regardless of background.
- Matte fabrics over glossy finishes even in the same color. Two identically colored jackets with different surface finishes will behave very differently in low-light or post-rain conditions.
- Pattern is secondary to tone and shine. A solid muted jacket outperforms a high-contrast camo print in most real environments. Pattern helps at close range — tone and shine control matter at distance.
Test your kit before you need it. In daylight, at home, lay your gear against the wall and step back 20 feet. Then photograph it and look at the photo — cameras flatten the depth perception that your eyes use to “see past” contrast, and show you roughly what a distant observer sees. High-contrast items that seemed fine up close become obvious in photographs.
Pre-Camp Concealment Audit: Clear This Before You Unpack
Run this before committing to a site and before any gear comes out. Five minutes of deliberate audit prevents hours of signature management after the fact — and prevents the kind of setup error you cannot fix without striking camp entirely.
-
□// SiteBackground confirmed. Shelter’s largest visible face has a matching background — not sky, not open meadow, not bright rock.
-
□// SiteObservation angles checked. Trail, ridgeline, and water source angles assessed. Site is not inside a movement funnel.
-
□// SiteWind and smoke direction confirmed. Cook sector is downwind of sleep. Smoke will not channel into a valley occupied by other parties.
-
□// SafetyNo hazard trade-off. Site is not in a flood zone, cold-air drainage trap, or below unstable terrain — concealment has not compromised survival position.
-
□// ShineReflectives stowed or covered. Cookware inside, hardware not hanging, phone screens at minimum brightness.
-
□// LightNight light plan set. Headlamp on lowest/red setting. No sweeping beams confirmed as a rule, not a reminder.
-
□// SectorsSleep, cook, water, and waste sectors identified and confirmed distinct. No overlap between cook and sleep zones.
-
□// SoundPre-dark noise work complete or scheduled. All hardware, chopping, and loud tasks completed in daylight or explicitly planned before dark.
-
□// MovementEntry/exit route established. One clean path into the sleep sector. Water and cook approaches will be varied to prevent trail formation.
-
□// SignZero visible waste or disturbance from approach corridor. Nothing is visible from the last 50 meters of the trail or approach route.
- DD Hammocks Camo Tarp
- Aqua Quest camo waterproof
- SE Adventure supply camo
- Black Diamond Spot 400-R
- Petzl Actik Core
- Fenix HL18R-T red mode
- Pro Tapes black gaffer
- Shurtape matte cloth
- Permacel P-665 black
- Ranger green softshell
- Coyote brown hardshell
- KUIU Verde 2.0 camo
- GSI Hard Anodized Pinnacle
- MSR Black Lite pot series
- Toaks titanium black finish
- BearVault BV500
- Garcia Backpacker’s Cache
- Ursack AllMitey
- National Geographic Trails Illustrated
- CalTopo waterproof custom print
- Mytopo waterproof
- Granite Gear air zippered sacks
- Outdoor Research dry sacks — muted
- Sea to Summit Ultra-Sil — dark