Brackish and Saltwater Survival: When You Can’t Drink What You Find (Solar Still Builds, Distillation Basics, and Hydration Myths)
Brackish and Saltwater Reality: Why “A Little” Can Make Things Worse
Salinity, osmosis, and the kidney problem you can’t out-muscle
Saltwater isn’t just “dirty water.” It’s water with a salt load your body can’t process without paying a fee in more water.
Related Articles:
Your kidneys can only concentrate urine to a certain level. When you drink seawater (around 3.5% salt), you force your body to pull water out of your cells and bloodstream to flush that salt back out.
That’s why the old rule is accurate: saltwater makes dehydration worse. It can also trigger vomiting and diarrhea, which compounds fluid loss fast.
Brackish water (river mouths, mangroves, tidal flats) is less salty than seawater, but it’s still often salty enough to start the same downward spiral.
If you want a credible reference point, the U.S. Geological Survey has a straightforward overview of desalination principles and why salt removal is a different problem than filtering silt: USGS desalination basics.
Brackish water traps: tidal timing, storm surge, and “fresh” that isn’t
Brackish water is the classic confidence trap because it doesn’t always taste like the ocean.
After rain, a tidal creek can look and smell “fresh enough,” especially if you’re hot and desperate. But tides push salt upstream, and storm surge can salt the land for miles.
In practical terms, assume any low-elevation water near the coast is suspect unless you can confirm it’s upstream of tidal influence.
Use environmental indicators as a quick screening tool:
- Mangroves and salt-tolerant grasses
- Barnacles or other marine growth on rocks
- Mudflats with tidal channels
- “Tea-colored” water in a tidal marsh (often brackish)
From a field perspective, your plan should be to find true fresh water first (rain catch, seep, spring, upstream tributary). Desalination is possible, but it’s slow, equipment-dependent, and energy-hungry.
Quick reality check: If your only water is brackish/salt, your priorities are (1) reduce sweat losses, (2) build/operate a still or distiller, (3) signal and move toward known fresh sources when conditions allow.
Hydration Under Stress: What Actually Matters (and What Gets People Hurt)
You’ve got the “why” behind the problem. Now you need to recognize it early, before thirst turns into bad decisions.
Dehydration signs you can act on before you crash
Most people wait too long because they’re looking for dramatic symptoms.
In real training and real field problems, dehydration usually shows up as performance failure: your pace drops, decision-making gets sloppy, and you start making “easy” mistakes.
Use this as a practical split between early and late signs:
Early signs (correctable if you act):
- Dry mouth
- Dark urine
- Headache
- Irritability
- Reduced sweating even when it’s hot
Later signs (problem is accelerating):
- Dizziness
- Confusion
- Rapid pulse
- Inability to keep fluids down
If you want a clean checklist-style reference, the CDC overview is useful for symptoms and risk factors: CDC guidance on dehydration. Use it like a sanity check, not a diagnosis tool.
Hydration myths: small sips of seawater, alcohol “warming,” and over-drinking
You’ll hear “take tiny sips of seawater to take the edge off.” Don’t.
Even small amounts add salt you must excrete, and the math doesn’t favor you. It’s a short-term comfort move that creates a bigger problem later.
Another bad idea is alcohol for warmth. Alcohol dilates blood vessels and increases heat loss. It also impairs judgment and can worsen dehydration.
On the other end, don’t force huge volumes of plain water if you’re sweating heavily and not eating. Over-drinking without electrolytes can contribute to hyponatremia.
The fix isn’t “drink less.” It’s replace fluids and salts in balance, using food and smart electrolyte strategies.
The First 30 Minutes: Decision-Making When Your Only Water Looks Undrinkable
Once you accept the water in front of you is a trap, the next move is to slow your losses and pick the highest-payoff water plan.
Control the controllables: shade, pace, and sweating discipline
Before you start building anything, slow the problem down.
In military terms, you’re buying time and reducing your casualty rate (your own body). Get into shade, cover skin, and reduce unnecessary movement.
If you’re on open shoreline, wind and sun will strip moisture from you faster than you think. A simple windbreak and shade can be worth more water than you’ll produce from a poorly built still.
This is where smart site choice matters. Even if you’re not pitching a tent, the same principles apply: drainage, wind direction, and overhead hazards.
Use the mindset from shelter site selection and camp layout to pick a location that keeps you cooler and lets your system run uninterrupted.
Water source triage: rank options before you commit labor and calories
Don’t jump straight to “desalinate” just because you see an ocean.
Run a quick triage and pick the option that gives the most water for the least sweat:
- Rain catch (highest payoff, lowest energy)
- Dew collection (moderate payoff, early morning)
- Seeps and springs (best long-term)
- Upstream movement (payoff depends on terrain and distance)
- Solar still (slow but low-tech)
- Fire distillation (faster but fuel-intensive)
If you have a container and any chance of rain, set up catchment immediately. Even a short squall can fill a bottle.
Distillation is a tool, not a plan A.
Field rule: Any plan that burns more water (sweat) than it produces is a plan you cancel or modify.
Solar Still Fundamentals: What It Can Do, What It Can’t, and Why People Quit Too Early
If you’re going to build a solar still, do it with realistic expectations. That mindset keeps you from wasting daylight and energy.
How a solar still really works (and why placement is everything)
A solar still is controlled evaporation and condensation.
You heat a wet source (brackish water, plant material, damp soil), evaporate water vapor, and capture the condensate on plastic so it drips into a cup.
It’s simple physics, but execution matters. Your still needs:
- Strong sun exposure
- A good vapor seal
- A cool condensation surface (plastic with airflow)
- Minimal leaks and minimal shading
Place it where sunlight is strong for the longest window. If you tuck it into shade because it “feels cooler,” you cut output.
You can create your own shade next to the still while leaving the plastic fully exposed.
Output expectations: planning for ounces, not gallons
Solar stills are notoriously oversold.
In real conditions, a single survival still might produce a few ounces to maybe a liter per day if everything is ideal and you build it well.
If conditions are cloudy, humid, or you have poor soil moisture, you might get almost nothing.
That doesn’t make it useless. It means you treat it as a supplement and you scale by building multiple stills if you have plastic and daylight.
Here’s the honest math: if you need 2-3 liters/day to function in heat, you’re not going to hit that with one improvised still. The value is keeping you out of the “no water at all” zone while you signal, rest, and plan movement.
Solar Still Build: Ground Pit Version (The One Most People Try)
Now that the concept is clear, this is the classic build. It works-but only if you build it tight and leave it alone.
Materials, layout, and the mistake that ruins most builds
You need plastic sheeting (clear is ideal), a container/cup, and ideally a drinking tube so you can sip without opening the system.
You also need something to weigh down the plastic at the center (a small rock).
The most common failure is a loose seal. If vapor leaks, you lose output.
The second failure is a pit that’s too wide and shallow, which reduces heat concentration and makes sealing harder.
Aim for a pit roughly 3 feet across and 18-24 inches deep if soil allows.
Put your cup in the center and keep brackish water or wet material around it, not inside it.
Step-by-step checklist you can follow under stress
Use this like an SOP. Slow is smooth, smooth is fast.
- Dig a bowl-shaped pit; slope the sides evenly.
- Place the cup in the center on stable ground.
- If using liquid brackish water, pour it into a perimeter trench or onto absorbent material around the cup.
- Stretch plastic over the pit with slack for a drip point.
- Seal edges with sand/soil/rocks all the way around.
- Place a small rock above the cup to create a low point.
- If you have tubing, run it into the cup before sealing.
- Check for leaks by pressing edges and watching for air movement.
After setup, leave it alone.
Opening the still to “check” it repeatedly is how you lose the tiny amount it’s producing.
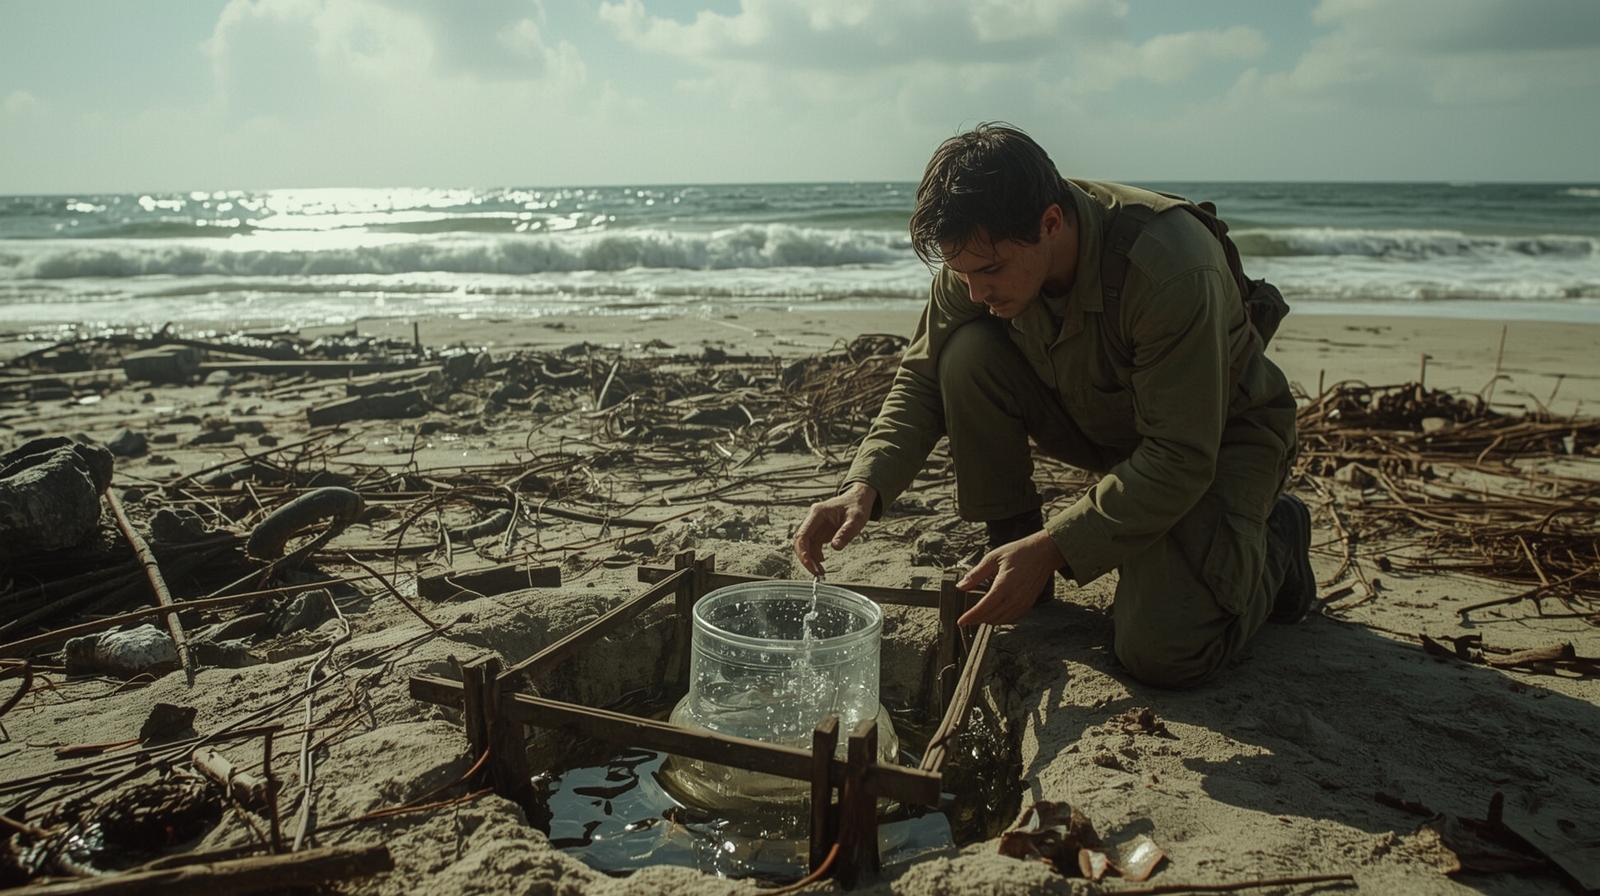
Solar Still Build: Above-Ground and Container Variations (When Digging Is a Bad Plan)
When you can’t dig (or shouldn’t), you’re not out of options. These variations trade efficiency for speed and lower effort.
Tarp still over a container: faster setup, easier sealing
If the ground is rocky, roots are dense, or you’re too depleted to dig, build above-ground.
You can create a mini “greenhouse” over a container of brackish water and capture condensate on plastic.
One effective version is a tilted plastic sheet over a dark container placed in the sun. Put a clean catch container at the low edge.
The water evaporates, condenses on the underside of the plastic, and runs down into the catch.
It’s not as efficient as a well-built pit still in some conditions, but it’s quicker and less labor-intensive. In survival terms, speed matters when you’re already behind on hydration.
Vegetation stills: useful, but don’t count on them to save you
Bagging leafy branches with clear plastic can produce water from plant transpiration.
It works, but output varies wildly by plant species, temperature, and humidity. Treat it as a “bonus” source, not your main plan.
The key is selecting living, sun-exposed foliage and sealing the bag tightly around the branch.
Put a small pebble at the bottom corner to form a drip point, then collect with a tube or carefully pour.
Don’t strip a plant bare. Harvesting too aggressively kills the branch and reduces output.
Also remember: in salty coastal zones, many plants are salt-tolerant and may yield low-quality output. Test taste cautiously, and prioritize distillation if the condensate tastes off.
Distillation Basics: Turning Saltwater into Drinkable Water With Heat
If solar is slow or unreliable, heat-based distillation is your next lever. It costs fuel, but it can beat waiting on the sun.
Simple pot distillation: what works with common camp gear
Distillation is the straightforward solution: boil the source water, capture steam, and condense it into a clean container.
Salt and most contaminants stay behind.
If you have a lidded pot, you can improvise a basic still:
- Put brackish/saltwater in the pot.
- Place a clean cup in the middle (floating is bad; stabilize it).
- Invert the lid so condensation runs toward the center.
- Add a small weight on top of the inverted lid to create a low point.
- Bring to a steady simmer.
Steam condenses on the lid and drips into the cup. You’re making distilled water.
The tradeoff is fuel: you are converting heat into water slowly, and you must keep the fire controlled.
If you want better reliability in wet weather, being competent with fire is non-negotiable. The skills in all-weather firecraft for rain and snow translate directly to running a distillation setup.
Condenser coil setups: higher output, more parts and more failure points
A condenser (tube/coil) increases output because it cools steam efficiently.
If you have metal tubing (or can improvise with copper line from a vehicle kit), you can route steam from a sealed pot into a coil cooled by seawater or wet cloth.
This is closer to a “real still,” but it introduces hazards.
Sealing the lid poorly can vent steam (lost water) and risk burns. Using unknown plastics near heat can off-gas chemicals.
If you do build a condenser system, use metal and keep all plastic well away from heat.
Route the output into a clean container and protect it from salt spray and sand.
Fuel, Time, and Safety: Running Water Production Like an Operation
At this stage, the difference between success and wasted effort is process. Treat water production like a task you’ll run for hours, not a quick hack.
Heat discipline: simmer beats rolling boil for efficiency and control
A rolling boil looks productive, but it can waste fuel and increase risk of splashing saltwater into your catch container.
A steady simmer produces consistent steam with less turbulence. It’s also easier to maintain without constant babysitting.
Set your stove or fire so you can maintain the same output without frequent adjustment.
If you’re using open fire, build a stable platform for your pot and keep your fuel staged.
This is also where many people burn themselves. Steam burns are nasty because they transfer heat fast.
Treat steam like an invisible hazard zone: hands away from lid gaps, face back when checking, and don’t lean over the pot.
Water workflow: keep “dirty,” “processing,” and “clean” separate
In the field, cross-contamination happens when you get sloppy.
A little brine splashed into your catch water ruins the entire cycle. You need separation and discipline, even if you’re tired.
Set up a clear workflow:
- Dirty zone: source water and scoop
- Processing zone: pot/still (hot, splash risk)
- Clean zone: catch container, drinking container, and any caps/lids
A few practical habits that help:
- Never dip a “clean” cup back into the source.
- Keep the catch container covered when not actively receiving drips.
- Move slowly when handling the pot lid to avoid brine droplets.
- If you suspect contamination, discard the catch and restart. It’s painful, but it’s safer than drinking brine.